The Data Export Service is a new and exciting service from Microsoft. It is usually referred to in the context of creating SQL based reports on Dynamics 365 data. However, it is lot more than that and can definitely be leveraged for Power BI as well. I will explore that in this blog post and go through a step by step of the easiest method I have found so far to set it up.
What is the Data Export Service?
The Data Export Service is a cloud-based service that replicates your Dynamics 365 data, to an Azure SQL database and keeps it updated. Here are some benefits for why you might want to do that:
- Significantly faster querying times in Power BI
- Can aggregate multiple sources into one database
- More flexibility with the data and can use SQL queries
- Less impact on your production environment as analytical queries are in a separate database
- With Power BI Pro, can get closer to real-time analytics with Dynamics 365 data using DirectQuery to the Azure SQL database
Another reason I find the Data Export Service interesting, is that it is also used for the new Azure Customer Insights functions, so when that is finally released, you can use the Data Export Service to see if your data there is up to date too.
I will not get detailed on the setup of the Data Export Service. Scott Durow already posted a great video on how to set it up in detail, and if you are planning on using the Data Export Service in a production environment, you should definitely watch it.
However, the setup does require some skills and you’ll need to fire up PowerShell, install the Azure cmdlets to create an Azure Key Vault, and create an admin user in the Microsoft SQL Server Management Studio. If that is not your thing, and you just want to try it out, then Microsoft has made a Power BI Solution Template available that will let you skip most of those steps.
Setup Data Export Service using Solution Template
My starting point is a trial for Dynamics 365.
I’ll need to add two services to it before I start with the solution template. The Data Export Solution and signing up for a free Azure Trial.
1. Install Data Export Service
Inside Dynamics 365, go to the AppSource and search for “Data Export Service”.
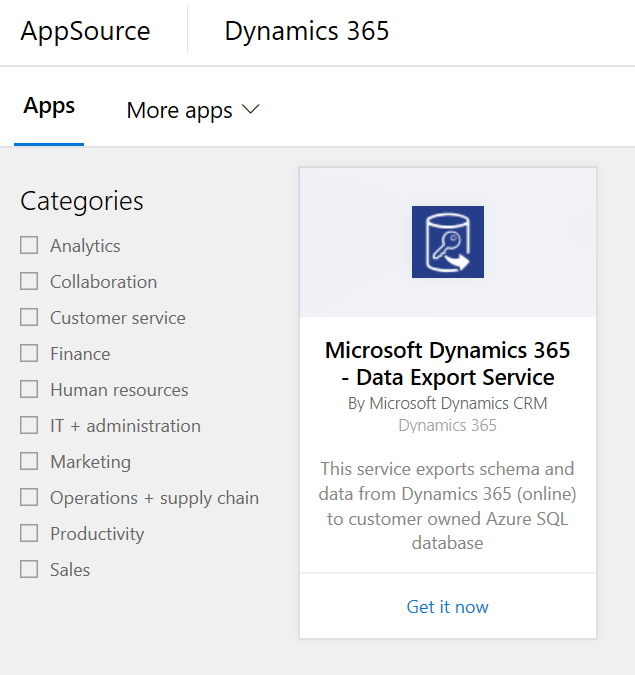
Click on “Get it now” and go through all the steps of installing the solution. Basically just click “Next” until it is installed.
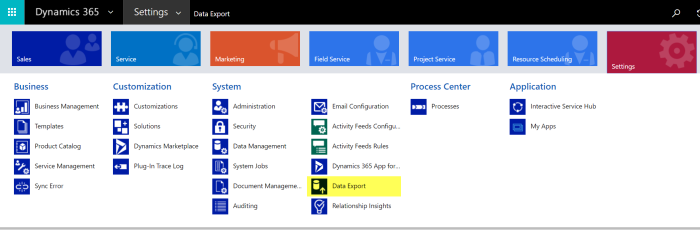
Once the installation is complete, navigate to the Data Export Service in Dynamics 365.
There you will need to accept some licensing agreements etc.
2. Sign up for Azure
Open up a new tab in the same browser and go to https://azure.microsoft.com/en-us/free/

Click on “Start free” and follow the instructions. You will need to verify your identity with both phone and credit card. No worries, you won’t be charged for a trial unless you explicitly change your subscription. And I am of course not liable for any charges 🙂
When Azure is all set up, just leave it open in its tab. If you accidentally close the tab, you can always get it back on https://portal.azure.com
3. Power BI Solution Template
Open a new tab again and go to https://powerbi.microsoft.com/en-us/solution-templates/dynamics-crm/
This is the Power BI Solution Template that will setup the Data Export Service and provide a Power BI file with some premade reports.

Click on “Install now”
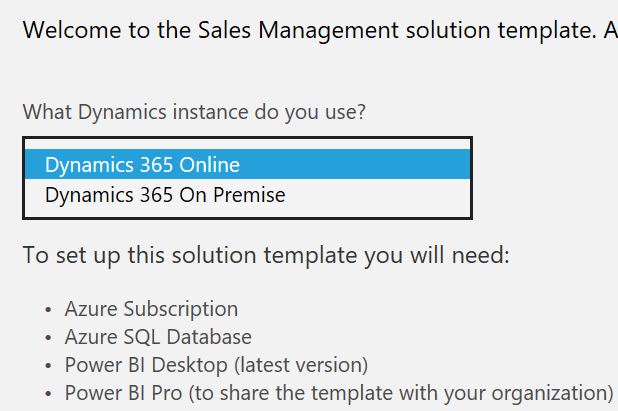
Select “Dynamics 365 Online” and click “Next”. Note that you could also use an on-premise installation of Dynamics 365.

Click “Connect” and authorize a connection to your Azure subscription. You may be prompted to log in again. If so, use your credentials for the trial environment that you are using.

Make sure the right Dynamics 365 organization and Azure subscription is selected. If you have a trial and follow these steps there should only be one option for each. Remember to check the box for authorizing the deployment of the template.
If you click “Advanced” you can optionally name your resource group in Azure. Or if you are ok with a random text string for a name, just leave it and click “Next”.

Click “Connect” to connect to and authorize the Azure Key Vault. You may be prompted for login credentials again. This step is really cool as it is the one that lets you avoid firing up PowerShell.

You are now connected. Click “Next”.
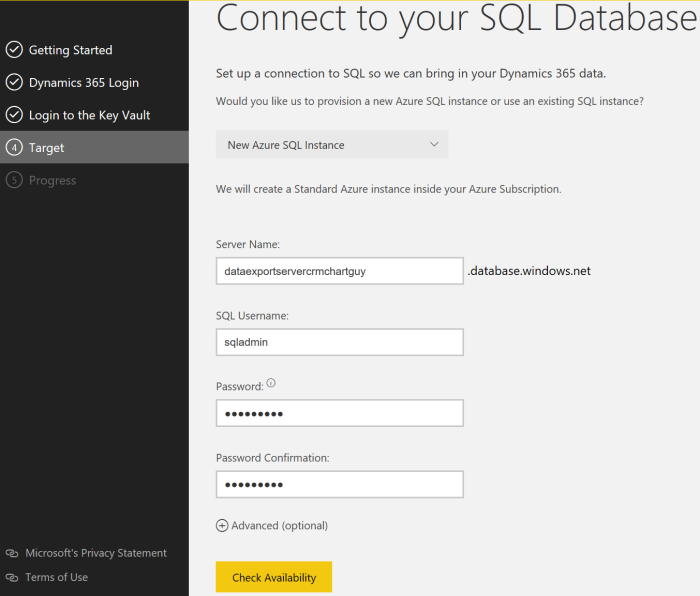
Next step says “Connect to your SQL Database”, but you have not created one yet. Don’t worry. That is what this step does for us.
Enter any name in “Server Name”. It just has to be unique. Create a SQL Username and password and make sure you remember them.
Click “Check Availability” and if everything looks good click “Next”.
“Advanced” options on this screen will let you set a pricing tier for the Azure database. I will return to what that means later in this post. You can leave the default setting as is as it can always be changed.
Note that you can also change the destination to an existing Azure SQL database if you already have one.

Now the solution template will do all the heavy lifting and
- Create an Azure Resource Group
- Create a SQL server and database with the credentials you gave
- Create an Azure Key Vault
- Create an admin user in your database for access
- Create a replication profile and connect it via the Key Vault
- Start adding data to your SQL database from Dynamics 365
Pretty nice right?
Once it has gone through all the steps it will start downloading a Power BI template for you.

When it is ready, download the template.
And that’s it for setting up the Data Export Service with a Power BI Solution Template.
4. Verify the Data Export Profile
Go back to Dynamics 365 and navigate to Settings -> Data Export.

Click directly on the name of the profile to open it. A double click on the line won’t work here.
This is also the view where you would see your Azure Customer Insights (ACI) connection once that feature is ready.
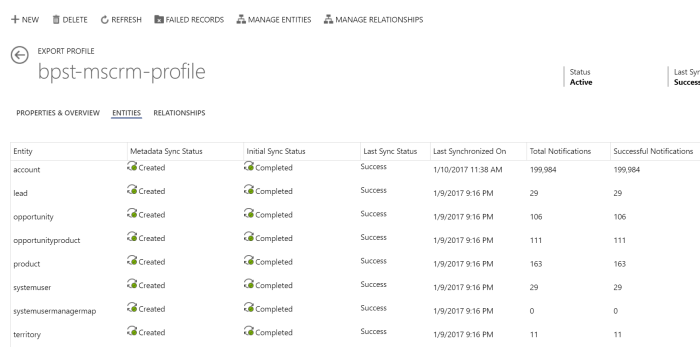
Here you can see the sync status of all the entities included. Initially, you may see some errors due to dependencies on a few entities, but they will resolve themselves as the data gets loaded completely.
Note the buttons on the top of the screenshot for “Manage Entities” and “Manage Relationships”. Use those if you want to include entities that were not already included in the solution template.
5. Azure
Open your tab with Azure and refresh it.
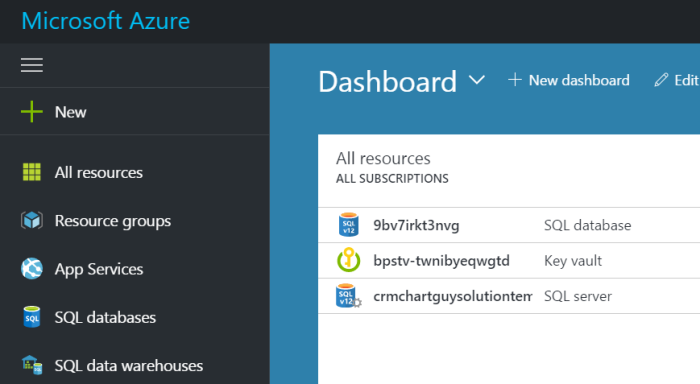
You should see three items. Make a note of the database name. 9bv7irkt3nvg in the example above. No need to do anything with them, but that is where your SQL server, SQL database, and Key Vault is.
6. Power BI
Now that we have an Azure SQL copy of our Dynamics 365 data, we can use that in Power BI.
Open the Power BI templated that you downloaded earlier.
The first report actually has the instruction for getting set up, but they haven’t really worked for me, so here are the steps I use.
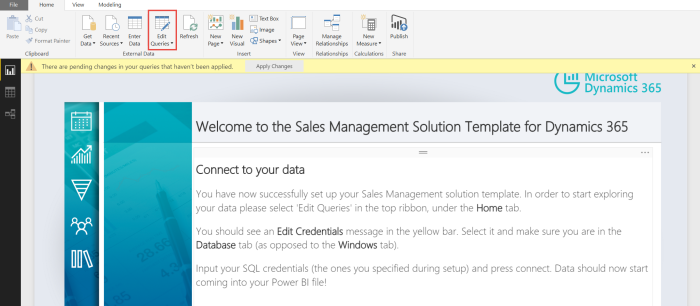
Go to “Edit Queries”

Data Source Settings

Change Source
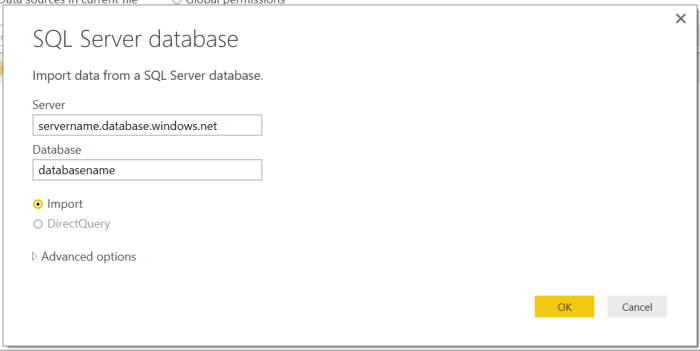
In the Server field, replace “servername” with the name you gave the server during the setup. Make sure the .database.windows.net is included at the end.
In the Database field, add the name of the database that was generated. It is something weird like 9bv7irkt3nvg. If you forgot, go back to Azure and copy it from there.
When done click “OK”.
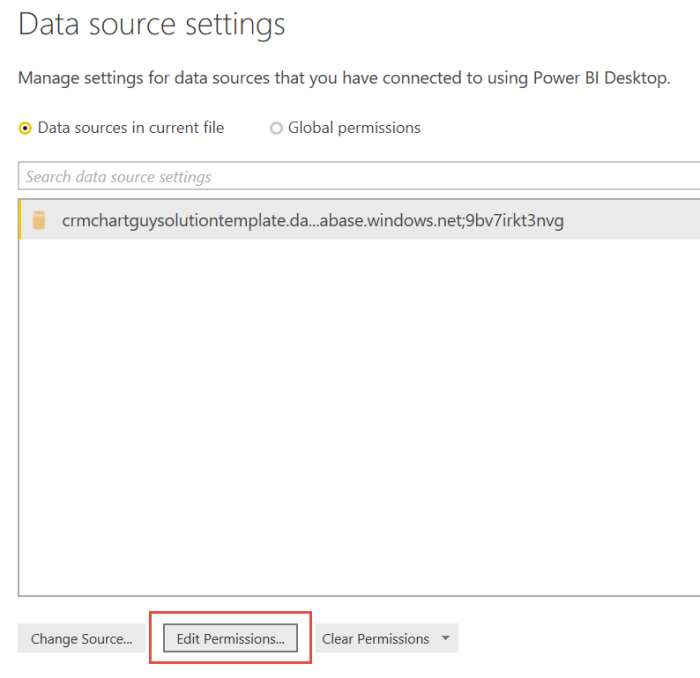
Then go to “Edit Permissions”
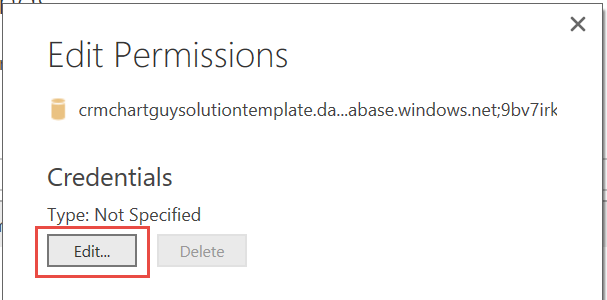
Click “Edit”

Make sure the tab is “Database” on the left-hand side. Enter the database login details you created earlier and hit “Save”. Then click “OK” and “Close” until you are back to Query Editor.

Click on “Refresh Preview” to ensure it is working. You should now see the preview data populate.
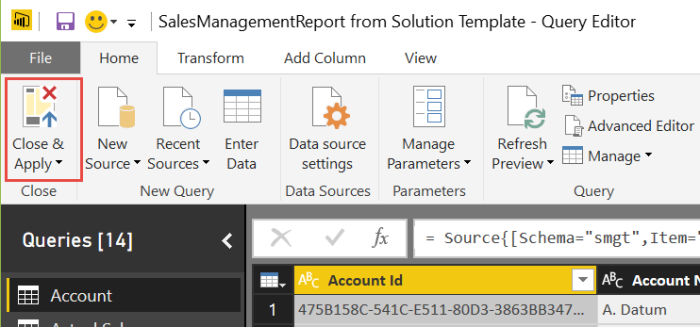
Click on “Close and Apply” and the data will load into Power BI from your Azure SQL Database rather than from Dynamics 365.
Scaling your Azure database
In the beginning of the blog post, I mentioned a number of reasons why you might want to take this approach. One of them was significantly faster querying times.
Well, how much faster? That depends partly on how much money you decide to throw at your SQL database.
In Azure, you can see the pricing tier for your database. It is measured in Database Transaction Units (DTUs). You can read a lot more about DTUs here.
The short story is that the more expensive it is, the more performance you are getting.
Go to your tab on the Azure portal and click on the SQL database. The one with the randomly generated name.

Under “Settings”, click on the “Pricing tier (scale DTUs).”
By default, it is setting you up with the version that costs about 75.02 USD a month. Don’t worry, it’s a part of the 200 USD you got for free with the trial.
You can select any of the other tiers and click “Select” and the database will immediately scale to the new settings. It only takes a few minutes but varies depending on the amount of data.
So how much of a difference does it make?
Well, here are some tests refreshing from a Dynamics 365 organization with about 262K records.

All times are of course approximate and can vary depending on the amount of fields per record etc. The initial refresh might also take a little longer than the following refreshes.
The standard OData connection directly to Dynamics 365 took about 2700 seconds to refresh. That is 45 minutes!
From the Azure SQL database and at the cheapest rate of 4.99 USD a month at 5 DTU it took about 120 seconds. Or around 2 minutes.
For 15.00 USD a month and 10 DTU it is down to 45 seconds. From then on you don’t win that much for the extra cost, unless you have other reasons to upgrade your database. The 100 DTU version is 150 USD per month.
As you can see, there are some significant differences in the time it takes it takes to query the data. Even at the cheapest version, there’s over a twentyfold increase in speed. In fact, it’s kind of mindblowing. So skip one almond milk latte per month and get yourself an Azure SQL database.
Keep in mind that you can scale the database anytime you like. So if you plan to work in Power BI for a day and test out a lot of queries, you can increase the pricing tier for a couple of hours. Just remember to scale it down afterwards.
Glad you made it to the end. Hope you found something useful. As always please sign up for my newsletter and follow me on Twitter. Follow @CRMChartGuy

Super Thanks for the great post. You are the best
[…] « Setup the Data Export Service with a Power BI Solution Template […]
Hi, Thank you for a great post. Do you know whether the Data Export support Dynamics 365 Operations or only the Dynamics 365 Sales (CRM) ?
Thank you Allan. I have not seen anything for “Operations”, but I also haven’t been looking. I can tell you that behind the scenes, the service is called something like the “crmreplicatorservice”, so that indicates the focus may have been for the CRM piece only. So for now I think you’d have to use a third party tool to do the same thing for Operations, but I wouldn’t be surprised if this changed in the near future. That’s pure speculation though.
Hi Ulrik,
Thank you for getting back to me. I a have to talk to MS to see whether this is in the roadmap. I would prefer this over Data Factory due to incremental updates and no maintance of Stored Procedures from our part 🙂
Thank you for the great post. How can I connect to this database in SSRS and make the report available in Dynamics 365 Reports area?
Hi, Thank you for a great post. […] « Setup the Data Export Service with a Power BI Solution Template […]
Thanks for the post. Re your comparison of odata vs direct SQL, did your odata connection join tables based on the _value columns? From what I understand from the screenshots above you were drawing down more than one table.
See links below. Could this have skewed your results?
http://us.hitachi-solutions.com/blog/fast-vs-furious-powerbi-dynamics-crm-avoid-common-mistake-watch-data-fly/
https://crmtipoftheday.com/2016/06/10/turbocharge-crm-to-powerbi-connection/
Hi Stephen. For the comparison test I was only including the account table, so that was done separately from the solution template which includes a number of tables. No other tables were included. These tests were made at the end of last year (2016). That’s like 5 or 6 iterations ago for Power BI (so ages ago) and improvements have been made since then. On the other hand I have noticed since then that the speed in Power BI varies significantly when connected to an Azure SQL depending on your current connection and your distance from the chosen Azure region, although always much faster than the OData connection. Also, my home office is closer to the Azure data center used, than the nearest Dynamics 365 data center. All the tips in the mentioned blog posts you referenced are definitely valid and should be followed for better performance when connecting Power BI to a OData source, but currently there is still a long way to go before they meet the performance of an Azure SQL database. Even for the cheapest version of the Azure SQL. Given the frequent updates, it might actually be fun to measure the performance over time with the same data set.
Re your comparison of odata vs direct SQL, did your odata connection join tables based on the _value columns? Also, my home office is closer to the Azure data center used, than the nearest Dynamics 365 data center.
Re your comparison of odata vs direct SQL, did your odata connection join tables based on the _value columns? […] « Setup the Data Export Service with a Power BI Solution Template […]
This was an awesome post Ulrik. I’m curious about the DES solution for D365. What do we miss if we don’t install it? I implemented the PSA and Sales Solution Templates without installing DES in D365 and so far I’m not immediately seeing that I miss anything. Then again I installed all these in a trial so I don’t have that much data in the environment.
Hi Antti
Thanks for your question. You can use DES without installing the app in Dyn365, which is what you are currently doing. Not a problem. Installing DES allow you to monitor the setup and health of the service. More importantly, it also allow you to add more entities and relationships to your model. Without installing DES you are “stuck” with what the solution template gives you.
Hi Ulrik,
Great post 🙂
I have a problem with the PowerBI solution for PSA. We installed it on our environment, but the data does not refresh. We have tried to install the DES as well, but we weren’t successful, we received the following error message instead of the list of organizations: Add the application to Dynamics 365
Select the Dynamics 365 organization you want to add this application to.
Sorry, we couldn’t find a Dynamics 365 organization connected to the signed-in user. Please use different credentials or sign up for a free trial and try again.
Our azure admin guy receives the same error message, and we do not have any idea, how to proceed.
Any ideas?
Thanks
Thanks a lot for this! Do you have any idea how these solutions are created? It looks like it creates logic apps etc on the tenant account. Would be very interesting to know how this is done for other type of deployments!
Hi Ulrik,
As always, your articles are very much appreciated.
I have a question regarding the Data Export Service (DES). I intend to use the DES to export data from our D365 online application to an Azure SQL DB. I shall not be using any standard PBI templates, so my question is directly on the DES moving data from D365 online to Azure SQL.
One of the things I’m finding tricky is the various lookup fields (Option Sets, Regarding Fields, etc..) that D365 has. To date, I’ve only seen the data using the standard ‘Dynamics 365 (online)’ connector (I am aware of the FetchXML/PQ) approach) and in doing so I see the relating fields via expandable columns. I find this confusing and it isn’t very transparent for me (or anyone I’d imagine).
To my question, does the DES allow for these lookup fields to be exported, from D365 to Azure SQL, as standard and therefore these lookup fields now are very transparent in Azure SQL DB tables (so no expanding is required)?
My aim to simply to export the confusing D365 data structure to Azure SQL DB so I can clearly see, without any additional steps (i.e. expanding), all the tables and their fields, so I can write T-SQL queries to join/filter the data to return my subsets of data.
If you can shed any light on if the DES will do as I require or provide another method of achieving what I require – it will be hugely appreciated.
Thanks in advance, and please keep up with this very useful articles.